So a couple of years ago one of my girlfriends from the Northeast started offering beautiful decoupage shells in her Etsy shop (Coral Door Designs is her shop). Sarah has always been so talented and her pieces that she offers speak to her dedication to her craft. I fell so in love with them that I wanted to see if I too could make them as well as she does. Not in competition mind you, because there is no comparison she’s amazing, but because I’ve always loved the idea of decoupage and wanted to give it a go.
With all that said, I went to Youtube and Pinterest to see what it would take to decoupage anything. The longer I messed around with the art the more I came to see that just about anything could be used from rocks, to shells, plates to even tin cans!
After a few years of practice I was in need of some pots. Pots to plant some excess aloe in among other plants. I needed to either give them away or offer them up as orphans to anyone who will adopt them. What better way to get them adopted than to dress them up in a fun container. Something different; something colorful & perhaps spectacular!

The thought of decoupage tin cans came to mind. In a family of 5, tin cans are easy enough to come by…hell…on any given day I could harvest 2-3 easily. So that’s what I did. Small cans, big family size soup cans, medium size cans…all different sizes for the recycling; a second life was definitely on the table.
If you are a collector of things like I am then you probably have plenty of napkin options to choose from. If not, then you can go to ebay and search up, “decoupage napkins.” If you want to do it on the cheap you can go to the grocery store and pick up any printed napkins. Home Goods also has a fun assortment. Any place that sells paper goods may have them too. Just find something that can be taken down to one ply. In a pinch you can even use tissue paper…it’s thin enough. Just be careful to go slow so you don’t tear it. If you tear it you may want to scrap it and start again from scratch. Don’t beat yourself up. Take a breath and try again.
First up you’ll want to start with clean cans. Trust a mama on this one. Next, you’ll need white spray paint or white paint. You’ll want to paint the can(s), bottom & sides. Don’t worry about the inside. Let the paint dry completely. You can go one of two ways at this point: First way I use is to pick the napkin I want to use and separate the layers of the napkin to either one ply or two ply. Or you can just apply Mod Podge straight away to the can and not care about the separation, but you may not like the outcome if the napkin is too thick.
**Note that one ply will tear easily, but will give you a cleaner look. Two ply is harder to tear, but gets kinda bubbly if you aren’t careful; it can also tear. Go slow.
Once you’ve decided, separated your napkins from their bulk, then you can start. I start with adding a layer of Mod Podge to the can; an even layer about 2″ wide. Then if the can has a line use it to line up the edge of the napkin. Slightly press the napkin into the Mod Podge. Be gentle! Then add more Mod Podge, press down more napkin and keep it up till you’ve gone all the way around the can.
If you have more napkin then you need you can cut the excess off with a scissors. Use the Mod Podge to press down the edges. At this point I’ve found it best to let the Mod Podge set up before putting a layer of Mod Podge over the top. I let it sit easily 20 mins or so. Then, carefully & slowly, I add my first layer of Mod Podge. Don’t put two coats on one right after the other you will screw the pooch. Again, go slow. One.layer.at.a.time. This isn’t a race. Take your time.
I usually stick with two layers. If you want the cans to stay outside use Mod Podge that is meant to survive the elements. I use glossy; that is only good for indoor use. After your second coat is dry I take my fingers and push it into the ridges. I also like to take and put Mod Podge on my finger and smooth down some of the bumps. If you try this with dry fingers you will rip the napkin. Always coat your finger before messing with the decoupage. If your napkin is taller than your can, use scissors to cut it close to the edge and fold it over. Make sure to spread the glue around the inside edge first before you fold it over.
After the cans are dry it’s time to turn them up side down and put holes in the bottom. I use a nail & hammer. Simple. I even chose to make a little smiley face out of nail holes; made me smile. No pun intended.
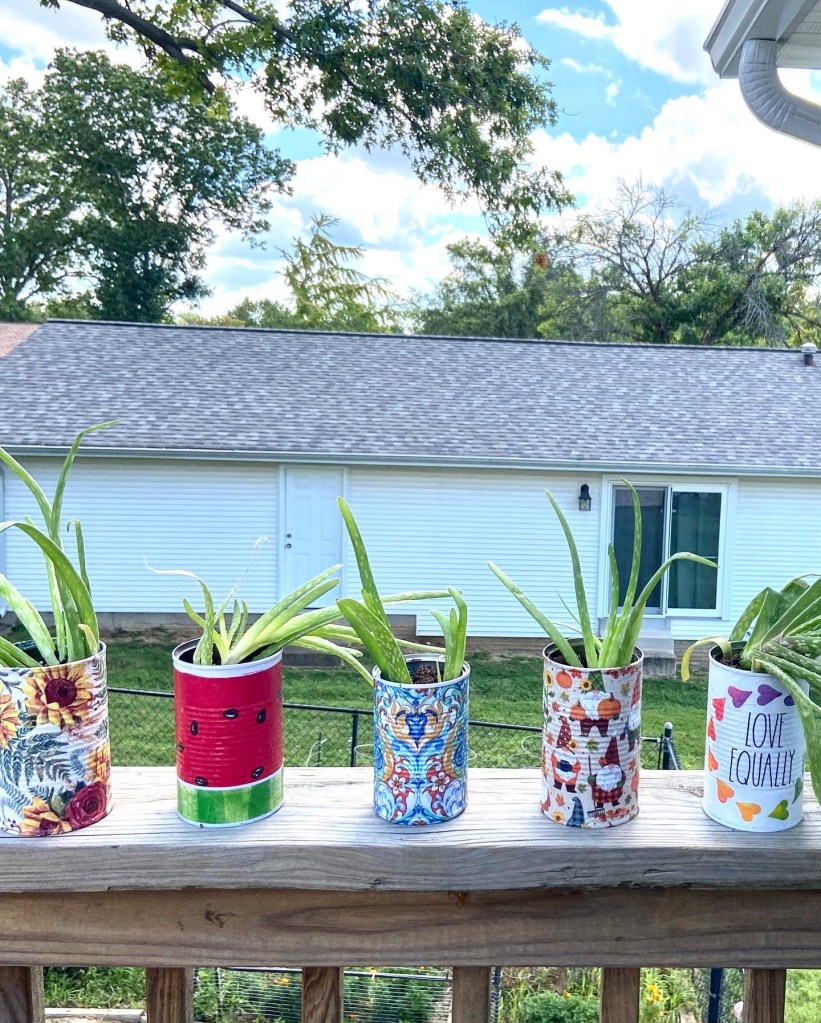
Finishing touches: soil & plants. Then et viola; all done. You can choose to add some kind of bottom to catch the water when you water them, but it’s up to you. This is how I choose to leave mine. These are ready for adoption & gift giving and I couldn’t be happier. ❤️

One thought on “Decoupage Cans”